It’s fall, and how do you decorate your front porch in the fall? With pumpkins of course.
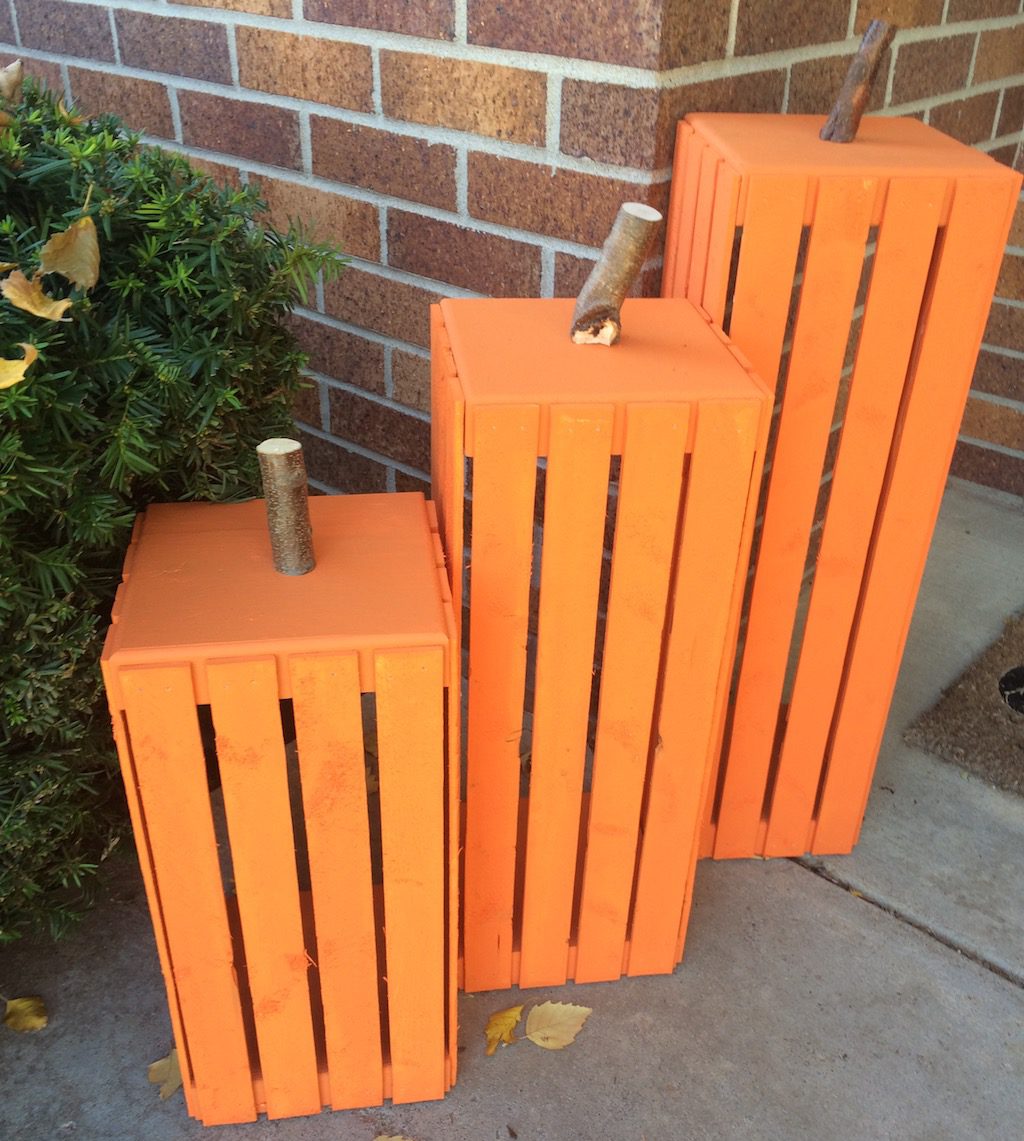
I happened to have some leftover pieces of lath from a previous project and some scrap lumber, and the next thing you know we had a DIY fall front porch pumpkin decoration made out of scrap wood. I chose to put lath only on three sides, but you could put them on all four.
There’s really not much to it, so it’s definitely an easy DIY project.
How to build your own fall front porch pumpkin decoration
Find or cut a couple of pieces of scrap lumber to serve as the top and bottom.

You can pick the size, they just need to be identical. I used part of a 2×8 and cut it so it was square. You can use just about any scrap wood, though I would recommend solid lumber (not plywood) as it will be exposed to the elements.
Buy a bundle of lath from the home improvement center.

I had purchased a bundle of lath for another project but ended up with quite a few left over. The nice thing is that these are really inexpensive (a bundle of 50 for around $15) and you can use them on many different projects.
Cut the lath to the length you want for the height of the pumpkin.

Lath are usually 4 feet long and 1.5 inches wide. Decide what height you want and cut the lath to length. If you are making multiple sizes (a grouping of 3, for instance), just pick measurements that allow you to use the leftovers from one size for another. I made ours 24, 20, and 16 inches tall. You could easily choose 12, 24, and 36 inches as this would allow you to build the 24 inch version by merely cutting the lath in half, and build the other two by cutting 12 inches off the 48 inch lath leaving 36 inches. Know what I mean?
Paint it orange.

It’s easier to paint the pieces before you assemble. Pick up a quart of exterior paint and have it tinted to the color orange you desire and use a small roller to paint them. Or you could always use spray paint. Don’t forget to paint the edges and ends of the lath which is easiest to do if you stack them all together and paint the ends and edges first before laying them flat to paint the sides. You may need two coats of paint, but that is your call.
Sanding a project like this isn’t necessary, but if you want your pumpkin to be smooth, then sand the parts before you paint them.
Assemble the porch pumpkin using nails and glue.

I have a brad nailer, so this step went really quickly. But it’s not that bad if you only have a hammer and nails. As I mentioned above, I chose to put the slats on only three sides so that we could potentially put something inside it even if only for storage purposes when not in use.
Keep in mind, metal nails will likely rust if exposed to the rain. To minimize rusting, simply paint over the nail holes.
Attach a stem.

For the finishing touch, drive a 2 – 2.5 inch screw through the top from underneath and cut a length of a stick to attach as a stem for the pumpkin. You could add a few leaves to the stem as well.
Display & decorate your new front porch pumpkins.

Simply arrange your front porch pumpkins how you like on your porch. You could dress them up with some fall leaves, corn stalks, mini hay bales, or even put some lights inside so they look good at night too.
