Using splines to reinforce miters in wooden frames and boxes is a relatively simple technique. In order to cut splines, you will need to build a spline jig for your table saw. While this video doesn’t show the process of building it, I took a few minutes to show my spline jig and explain how it was built and how to use it. A transcript of the video is below.
I originally learned this technique on a project in freshman woodshop class in high school. When you use contrasting wood species, it creates a nice visual detail as well. You can see an example of splines on this walnut sewing machine stand that I built. You can buy one, but building one is easy.
“Build a Spline Jig” video transcript
I want to show you today my spline cutting jig and setup.
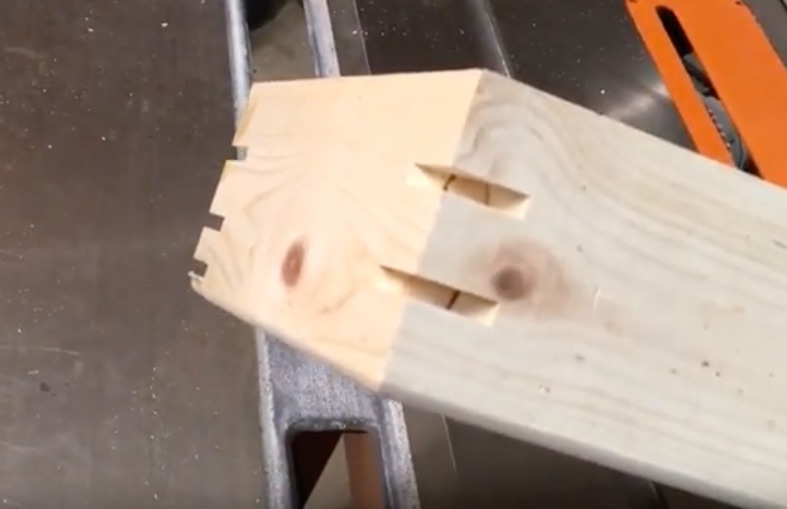
This is the test piece that I did for another project. As you can see, I’ve cut the splines into the corners and just never placed the splines themselves, although I did that in another corner as I was testing the project out on my prototype.
My spline jig
In order to cut splines, you have to build a jig. Here’s my jig. I was able to pick up a scrap piece of plywood at my local wood store inexpensively (they sell leftover off-cuts for cheap). This is actually three-quarter inch, pre-finished on both sides, cabinet-grade plywood that I cut up and then I used some thinner plywood (half inch) for the actual bed of the jig.
Build a spline jig
It was a fairly simple process to build. You cut a couple of square or rectangular ends to it the size you need. I used screws and attached these 45-degree blocks. I used a spacer to set that distance from the bottom so that I could potentially cut all the way up to the edge of the jig, or close to the edge. This way I can use the full width of the jig itself.
Again cut 45-degree blocks and attach using a spacer so you know it’s pretty exact. Then double-check all your measurements. repeat the process for the other side. You can see if I hadn’t had raised the attachment blocks, this cut would have been through the blocks and potentially through the screws. So I just gave myself plenty of room, knowing that if I ever need to cut deeper, and that close to the edge, I just need to use a spacer block inside the jib in order to not hit those parts.
Using a spline jig
Once built, you just place your piece in, clamp it wherever you need to, set your dado to the width you need, and run it through the table saw. You can reuse those holes if you’re cutting consistent splines. Once you get set up for one corner, you just flip it several times to get the other corners. Then flip it the other way, and you get consistent spacing from the perimeter without having to reset your table saw. Repeat the process for additional splines.
One thing to keep in mind is blowout (aka chip out). You need to make sure that when you’re cutting your splines that you’re using a hole that’s either the width of the blade or that’s a little bit smaller than the blade so that when you run it through you don’t have chip-out on the back side.
If you ever need to replace the bed, it will be as easy as pulling the screws, taking another piece of half-inch plywood, mitered on the bottom edge so it can sit fairly flat, and attaching it to the blocks.
It’s fairly simple jig because it is easy to build. If you ever need to cut splines, this jig is a must.