
If you are wanting to update your kitchen, or add a kitchenette, or simply change the look of your built ins, building your own DIY flat panel cabinet doors is a great option that won’t break the bank.
The best part is that you can build cabinet doors with just a table saw and a couple saw blades…a standard blade and a dado blade.
If you have some experience using a table saw, then building your own cabinet doors won’t be too difficult.
Watch the Video
It’s usually easiest to show someone, so here is a video I put together. If you want more details, scroll down and read the full instructions below the video.
How to build flat panel cabinet doors on your table saw.
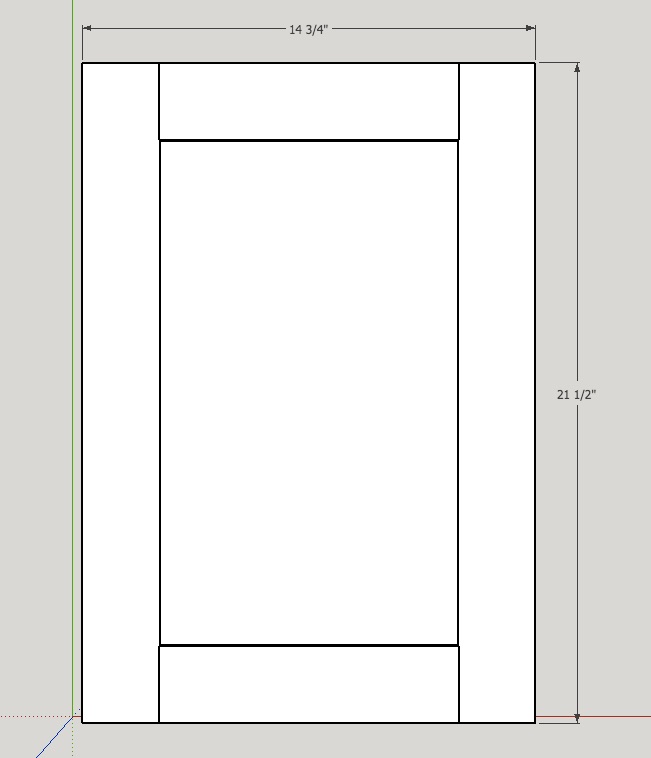
1. Determine the overall size of your door.
If you are replacing existing doors, this is easy. Simply measure the length and width of each door. Do not assume they are all identical. They could vary by a fraction of an inch here or there. Measure and write down those measurement, being accurate to 1/16 of an inch.
If you are building all new cabinetry, you will simply need your final measurements based on whether they are inset or overlay doors.
If they are overlay doors, meaning they overlap the face frame opening, determine how much overlay. This will affect the hardware you purchase. You may need to have the hardware picked out prior to building. The last doors I built were 1.25 inch overlay doors. This means they overlapped the face frame on the hinge side by 1.25 inches.
If they are inset doors, meaning they fit inside the face frame opening, you will allow for 1/16 inch gap on all 4 sides. This means the length and width of the doors should be 1/8 inch less than the overall opening.
More could be said about overlay, inset, and partial overlay/inset doors, but that is a discussion for another post. At this point, you just need to know what size to build your doors. In my case, it was 14.75″ x 21.5″.

2. Determine the width of your rails and stiles.
The rails and stiles are the vertical and horizontal pieces that make up the outer frame of the door itself. Rails run horizontally (like a hand rail) and stiles run vertically.
You can use standard 1×2 or 1×3 or 1×4 stock for your rails and stiles. Or you can use a nonstandard measurement, but if you do you will have to rip the stock to width yourself.
Most DIY flat panel doors are made with 1×2 or 1×3 stock. Keep in mind that these are 1.5 and 2.5 inches wide respectively.
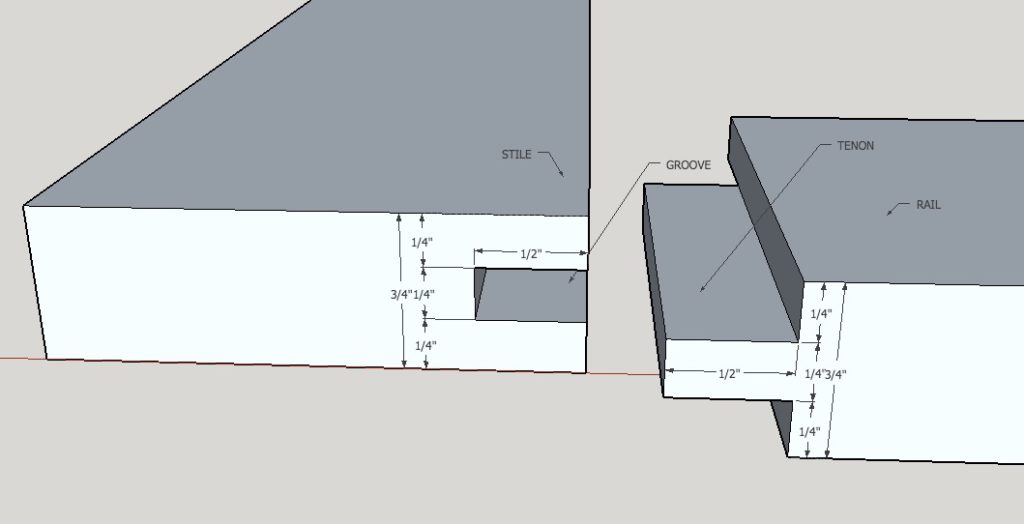
3. Determine the depth of the groove for your panel. This will also determine the length of the tenons on your rails.
I typically make the groove 1/2 inch as that makes the tenons a little longer and gives them a little more gluing surface. But you could make them as little as 1/4 inch deep.
4. Cut your rails and stiles to length, accounting for the length of the tenons on the rails.
Stiles, the vertical pieces, can be cut to the full height of the door as determined in step 1. These pieces will have groove on the inside edge, but won’t require any other cuts.
Rails, the horizontal pieces, will have a tenon on each end that will fit into the groove so rails must be cut longer than the visible portion. To determine the length, take the full width of the door, subtract the width of both stiles, and then add back the length of both tenons.

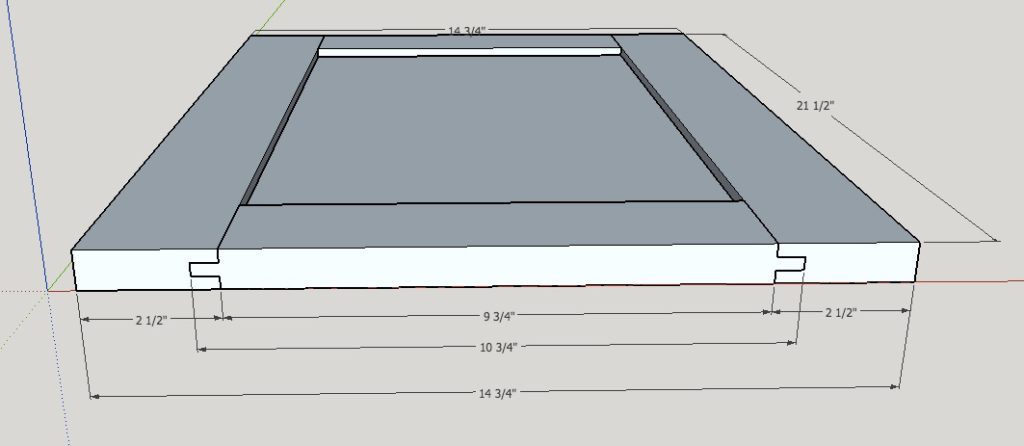
For example, a 14.75 inch wide door with 1×3 rails and stiles (actual width is 2.5 inches) and a 1/2 inch deep groove will need to be cut to 10.75 inches in length. Make sense?
14.75 – (2 x 2.5) + (2 x 1/2) = 10.75
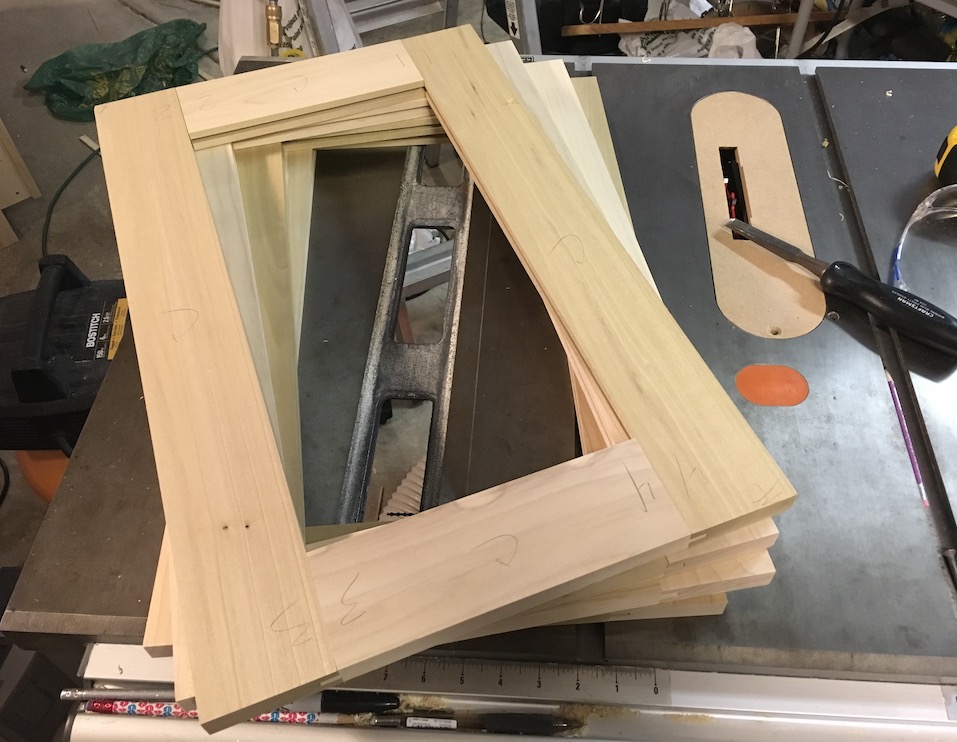
5. Divide your pieces into individual doors (2 rails and 2 stiles each) and determine which side of each piece will face inside and which will face outside.
Any face with small blemishes should face inward, especially on doors that will have a clear finish rather than paint. Blemishes in painted doors can be filled and hidden more easily than those with a clear finish.
Mark your pieces accordingly with a pencil and keep them together in their group. This will be important as you cut the grooves and tenons in future steps. My personal method is to layout each door with the good side up. I then mark a number on corresponding joints (1 through 4) as well as a common letter (A, B, etc.) to designate which pieces form one door.
6. Determine the width you will need for your groove to receive the plywood panel.

In most case, you’re panel will be 1/4 inch thick or slightly less (plywood is almost always a little thinner than it’s nominal thickness). Your panel should slide easily into the groove, but not fit to loosely.
7. Setup your table saw for cutting the groove, making sure to test on scrap pieces first.
I recommend setting up your tale saw with a 1/8 inch or 3/16 inch dado for cutting the groove as you will actually make 2 passes in order to get the full width.
The key to this step is that you will pass each piece through twice, flipping each piece end to end keeping the groove side down. This will insure that the groove is centered.
Adjust your fence and the height of the blade until the groove is the depth and width you need. Using a scrap piece, cut a groove (passing it through twice) and test it with your panel material (1/4 inch plywood) to make sure you are happy with the fit. Again, the panel should not be too tight or too loose. It should slide into the groove easily, but not have a lot of wiggle room.
Your groove should be cut on the inside edge of both the rails and stiles. If you marked your pieces correctly in step 5, the inside edge should be easy to determine.
Once you have had success on a test piece, you can begin cutting the groove on your rails and stiles, being sure to pass each piece through twice as previously described, keeping one face tight against the fence.
Before moving to the next step, test fit your panel material to the grooves you have just cut. If it the panel material is difficult to slide into the groove, make a slight adjustment to your fence (move it closer to the saw blade) and repeat this step.
If the panel seems to fit too loosely, don’t worry. You can compensate later in the process (step 12).
8. Setup your table saw for cutting the tenons on the rails, making sure to test on scrap pieces first.
The tenons will only be on the ends of the rails.
Your tenons should fit snugly into the groove and allow the shoulder to meet the stile tightly. If you cut your tenons too long, they will bottom out in the groove and keep the shoulder from meeting the stile.
I typically make my grooves 1/2 inch deep. It allows for more gluing surface than a 1/4 inch deep groove. Setup your table saw with a dado blade that is the same width as the length of your tenon (in my case 1/2 inch). Install a sacrificial fence and position it right up to the dado blade.
Adjust the height of your dado blade to match the groove you have already cut. Basically, subtract the width of the groove from the thickness of the material and divide by 2. In most cases, it will be around 1/4 inch.
It’s better to “sneak up on the cut” at this point. In other words, set the height of the blade a little lower than you think it needs to be. Test it on a piece, and raise the blade until you get the desired results.
Cut a test piece, passing both sides over the dado blade with the end firmly against the sacrificial fence. You will use your miter gauge to keep your material square. Put the end perpendicular against the auxiliary fence and slowly guide the piece across the dado creating a shoulder cut. Flip the piece over and repeat on the other side. After one end is complete, flip the piece end to end and repeat so that there are tenons on both ends.
Once you are happy with the fit of the tenons on your test piece, cut the tenons on the ends of each rail piece (but not on the stiles).
9. Cut your panel material to the proper size.
Your panel should be at least 1/8 inch smaller than the groove will allow. If you have a 1/2 inch groove, add 7/8 inch to the length and width of the actual opening.
10. Dry fit each door and panel.
Before each and every glue up, I always dry fit the pieces. I find that I often have to use a sharp chisel and fine tune each joint slightly to fit. This is why labeling the pieces in door groupings (step 5) is beneficial as you will be able to keep track of which piece fits where and make adjustments for that joint.

If any of the tenons are too tight, use a sharp chisel and carefully remove a small amount of material until it fits snuggly into the groove.
11. Sand your pieces prior to assembly, focusing on the areas that will be difficult to sand once assembled.
At this point, take some time to sand your panels and the inside edge of your rails and stiles. It is much easier to do at this point before the piece are assembled. The rest of the faces can be easily sanded after assembly, but inside edges are always difficult to sand. I typically start with 120-150 grit paper, and then move to 220 or similar.
12. Glue up each door, being careful to allow the panel to “float.”
In other words, you should only put glue in the areas where the tenon mates with the groove. The panel itself should NOT be glued in place.
If your panel is a little on the loose side, that’s OK. You can take a few toothpicks (flat ones work best) and use small pieces of them like shims. Wedge them on the back side of the panel in the groove so that the panel doesn’t rattle. This will also help close any gap on the front side if your groove was just a bit to wide.
Make any necessary adjustments to each door and clamp across each rail.
I prefer to cleanup any glue that squeezes out after it has dried, rather than while it is still wet.
13. Carefully remove any glue squeeze out and give the doors a final sanding.
Use a chisel to carefully remove drops of glue that were squeezed out of the joints when clamping.
For doors that will have a clear finish, test the glued areas using a damp cloth. Wiping a little water over the joints with a damp cloth will show you where glue would still prevent stain and finish to penetrate properly. Use a card scraper or sander to carefully remove the remaining glue without gouging the wood or creating an uneven spot.
Using a damp cloth will raise the grain in the areas that got wet. You’ll have to sand these areas again as you give the whole door one more final sanding with around 220 grit sand paper.
13b. Pre-drill for your hinge hardware.
This step can be done after finishing, but when I am using a hinge that requires drilling a “cup” on the inside of the door, I prefer to do it at this point. Standard screw-on hinges can be dealt with after finishing.
14. For doors that will be painted, fill any visible dents or blemishes with wood filler and sand smooth.
You can use filler on doors that will receive stain and clear finish, but just be aware that it might still be quite visible under the finish. When I am going to use a clear finish, I take extra time and care to select wood that doesn’t have blemishes at least on the side that will face out.
15. Paint or finish your doors to your liking.
Sprayed on finishes are the best for achieving professional results. However, you need professional spray equipment and experience. You can, however, achieve comparable results without a sprayer.
When painting cabinet doors, I use a brush for inside angles (like around the edge of the panel) and a 4 inch roller with 1/4 nap for all flat surfaces. I recommend starting on the back side of the doors so you can get the hang of it prior to painting the front sides. Just be sure to watch out for drips and runs and always brush or roll in the direction of the grain.
I find it better to apply multiple thin coats, lightly sanding in between with high grit sand paper.
See. Building flat panel cabinet doors is an easy project. Give it a shot.


2 Responses
I am a qualified workplace trainer and assessor. (Building Trades) I wonder why you didn’t show the assembly of the panels into the styles and T & B rails
I mention it in the video that I forgot to record that part and simply describe the process instead. Next time I do doors I’ll definitely record it! But I could do a better job describing it in the post and create a graphic to illustrate it.
Comments are closed.